Rainwater harvesting is one of the most practical and cost-effective water independence strategies a rural homesteader can implement. Collecting roof runoff for garden irrigation, livestock watering, and supplemental household use reduces dependence on well pumps, extends well life, lowers electricity costs, and provides a meaningful water reserve during drought periods or power outages. In most of the United States, a properly sized rainwater collection system can capture tens of thousands of gallons of free water annually from a standard metal or asphalt roof. This guide covers everything you need to design, build, and maintain a functional rainwater collection system on your homestead.
How Much Rainwater Can You Realistically Collect?
The potential rainwater yield from any roof is determined by a straightforward formula: Roof Collection Area (square feet) × Annual Rainfall (inches) × 0.623 × Collection Efficiency = Annual Yield (gallons). The 0.623 converts inches of rain on square feet to gallons, and collection efficiency accounts for losses to evaporation, splashing, and first-flush diversion (typically 80 to 85% for a metal roof, 75 to 80% for asphalt shingles).
A practical example: a 1,500 square foot metal barn roof in Nashville, Tennessee (average 47 inches of annual rainfall) yields approximately: 1,500 × 47 × 0.623 × 0.85 = 37,440 gallons per year. That is enough to irrigate a substantial vegetable garden, water a small livestock operation, or supplement household non-potable use through a full growing season. Even in drier regions — Phoenix, Arizona at 8 inches of annual rainfall — a 2,000 square foot roof still yields approximately 8,400 gallons, meaningful for supplemental garden watering.
Legal Considerations First
Before designing any rainwater collection system, verify your state’s rainwater harvesting laws. Regulations vary significantly across the United States. Most states actively encourage rainwater harvesting with no restrictions. Several states — including Texas, Virginia, Colorado (with certain limitations), and many others — offer tax incentives or rebates for rainwater collection system installation. As of 2026, only a small number of states and specific water districts retain meaningful restrictions on rainwater collection. The EPA’s Rainwater Harvesting page and your state’s department of environmental quality are the authoritative references for current regulations in your region.
Components of a Rainwater Harvesting System
A complete rainwater collection system consists of several integrated components. Understanding each component’s role helps you make intelligent design and purchasing decisions.
Collection Surface (Roof)
Metal roofing — standing seam steel or corrugated galvanized — is the gold standard for rainwater collection. It sheds water cleanly, does not leach chemicals, and is easy to clean. Unpainted galvanized metal is ideal. Asphalt shingles work adequately for irrigation-only systems but may leach trace amounts of asphalt chemicals that make the water unsuitable for drinking even after filtration. Painted or coated metal roofs should use food-grade paints if water will be used for vegetable irrigation or drinking.
Avoid collecting water from roofs with lead flashing, old asbestos shingles, or roofs treated with algaecide or biocide products. Cedar shake roofs have high tannin content that stains and can affect pH.
Gutters and Downspouts
Standard aluminum or galvanized steel gutters with leaf guards work well for rainwater systems. Size gutters to handle peak rainfall intensity — a 5-inch gutter handles up to 2,940 square feet of roof in areas with typical rainfall intensity; use 6-inch gutters for larger collection areas or high-rainfall regions. Downspout size should be minimum 3 inches diameter to handle peak flow without overflow. Clean gutters at least twice annually — clogged gutters reduce collection efficiency and allow organic matter to contaminate the water.
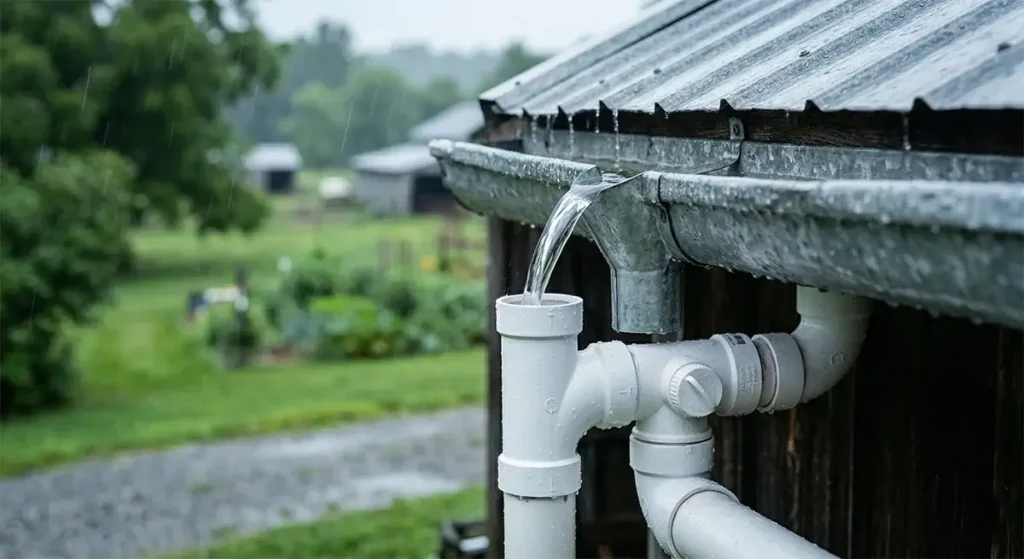
First-Flush Diverter
The first-flush diverter is one of the most important components in any rainwater system, yet it is the one most often skipped by beginners. The concept is simple: the first water that runs off a roof after a rain event carries the highest concentration of contaminants — bird droppings, dust, pollen, insect debris, and airborne pollutants deposited on the roof surface between rain events. A first-flush diverter captures this contaminated first portion and routes it to a standpipe that fills and seals itself while diverting the cleaner remainder of the rain event to the storage tank.
A commonly used sizing rule is 1 gallon of first-flush capacity per 100 square feet of roof area. For a 1,000 square foot collection area, a 10-gallon first-flush standpipe is appropriate. Commercial first-flush diverters are available for $20 to $60, or the standpipe can be built from PVC pipe with a small ball valve at the bottom that slowly drains between rain events.
Storage Tanks
Storage capacity is the single biggest design decision in a rainwater system. More storage means more water available during dry periods and allows you to capture large storm events for use over weeks. Less storage reduces cost and space requirements. Common storage options for homesteads:
Polyethylene rain barrels (55 to 100 gallons): The simplest and cheapest starting point. A single 55-gallon barrel costs $30 to $75 (or free as repurposed food-grade barrels). Linked arrays of 4 to 8 barrels provide 220 to 440 gallons at relatively low cost. Ideal for small garden irrigation supplementation.
IBC totes (275 to 330 gallons): Intermediate bulk containers are reusable food-grade plastic tanks inside a metal cage frame. They cost $100 to $250 used and stack in pairs, providing 550 to 660 gallons. They connect easily with standard hose fittings and are the most cost-effective mid-scale storage option for homesteads.
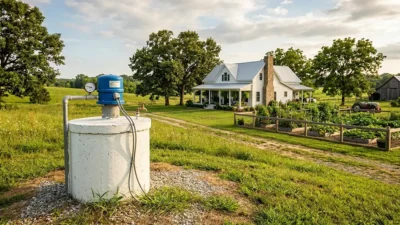
Polyethylene cisterns (500 to 10,000+ gallons): Purpose-built rainwater storage tanks designed for above-ground or in-ground installation. Above-ground polyethylene tanks in the 1,500 to 5,000 gallon range cost $500 to $2,500 and provide meaningful seasonal water reserves for larger homestead operations. In-ground cisterns offer temperature stability and space efficiency.
Overflow Management
Every tank must have a properly sized overflow outlet that routes excess water away from the foundation of your building. Size the overflow pipe at least as large as the incoming downspout. Direct overflow to a rain garden, swale, or infiltration area — never let it pool against your barn or house foundation.
Distribution System
How you get water from the storage tank to where it is needed depends on your pressure requirements and the elevation difference between tank and use point. Gravity-fed systems work if the tank bottom is elevated at least 2 to 3 feet above the delivery point — each foot of elevation provides 0.43 psi of pressure, so a tank elevated 10 feet provides 4.3 psi, adequate for drip irrigation but not for pressurized sprinklers. A 12V DC pump (solar-powered) or a standard 120V submersible pump provides adequate pressure for any delivery point regardless of tank elevation.
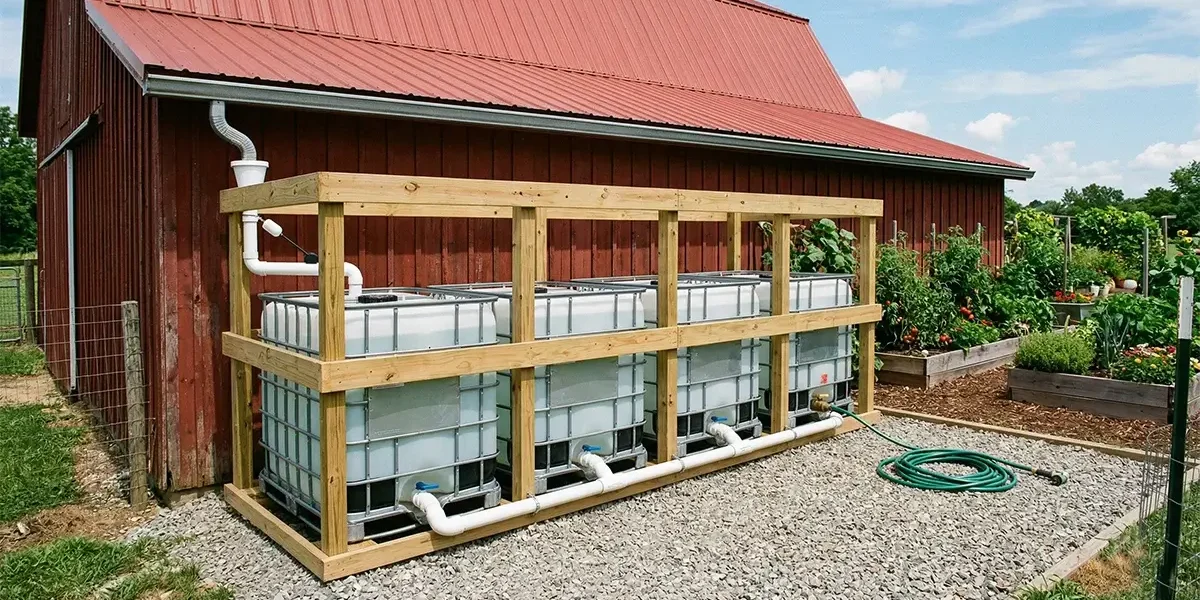
Building a Basic 1,100-Gallon IBC Tote System
The most practical entry-level homestead rainwater system uses four linked 275-gallon IBC totes for 1,100 gallons of storage. Here is the simplified build approach:
Position four IBC totes on a level, compacted gravel base (or concrete pad) adjacent to your collection roof’s downspout. Connect totes in series with 1.5-inch PVC pipe at their lower bulk-head fittings so water fills each tote from the bottom, creating even loading. Install a first-flush diverter on the downspout. Connect the downspout output to the first tote’s inlet. Install overflow pipes on each tote routed to the next or to a drainfield. Add a ball valve and hose fitting at the bottom of the last tote for gravity drainage. Cover totes to prevent algae growth — algae thrive in any sunlit water and clog fittings and filters.
Total cost for this system using used IBC totes and standard plumbing components: $400 to $700. Typical time to build: one weekend. It will collect and store the equivalent of 20 to 30 average rain events, providing meaningful irrigation water through summer dry spells.
Water Treatment for Different Uses
Treatment requirements depend entirely on intended use. For drip irrigation of vegetables where water contacts only the soil and not edible plant parts: no treatment beyond the first-flush diverter is necessary. For overhead irrigation of edible crops or for livestock drinking water: a sediment filter (50 to 100 micron) is strongly recommended. For household non-potable uses (toilet flushing, laundry, washing floors): sediment plus a UV disinfection unit. For drinking water: a multi-stage system with sediment filtration, activated carbon filtration, UV sterilization, and ideally a reverse osmosis final stage — this is a significant investment and most homesteaders find it simpler to use harvested rainwater for irrigation and livestock while using their well for drinking.
Maintenance Schedule
A rainwater system requires minimal but consistent maintenance to perform reliably. Clean gutters and remove debris at least twice per year (spring and fall). Inspect first-flush diverter after every significant storm for the first season until you understand how it performs. Flush storage tanks annually — open the drain, flush with clean water, allow to air dry 24 hours before refilling. Inspect all fittings, hoses, and connections annually for leaks, UV degradation, and pest intrusion. Check tank covers and screens for holes that could admit mosquitoes — standing water is a breeding ground for mosquitoes without proper screening.
Final Thoughts
Rainwater harvesting is one of the highest-impact, lowest-ongoing-cost infrastructure investments a homesteader can make. The initial build requires one weekend and a modest budget, and the system then operates largely passively for decades. Start with a single IBC tote connected to your barn or greenhouse downspout. Track how quickly it fills during rain events and how fast you draw it down during dry periods. That data will tell you exactly how to scale your system to match your actual usage patterns and rainfall realities.

Leave a Reply