
Making cheese at home is one of the most deeply satisfying skills in the homesteader’s repertoire. It transforms a perishable surplus of fresh milk into a concentrated, shelf-stable, endlessly varied product that has sustained human civilization for over 10,000 years. From a simple ricotta that takes 30 minutes to a clothbound cheddar that develops in a cave for 12 months, cheesemaking ranges from immediately accessible to a lifetime’s dedicated craft. This guide gives the beginning homestead cheesemaker everything they need to start making real, delicious cheese from fresh milk — without expensive equipment or an advanced culinary degree.
Understanding the Basic Science of Cheese
Cheese is made by separating the solid components of milk (curds — primarily casein protein and fat) from the liquid components (whey — water, lactose, and whey proteins). This separation is achieved by two mechanisms working in combination: acidification (lowering the pH of milk, which destabilizes the casein micelles and causes them to coagulate) and coagulation (adding rennet, which enzymatically cleaves a specific bond in the casein protein, causing it to gel). Every cheese in the world is made through some variation of this same fundamental process — the differences in flavor, texture, and character come from the milk source, the specific cultures used, the temperature and timing of the curd development, how the curds are cut and cooked, how the cheese is pressed and salted, and most importantly how it is aged.
The Four Essential Ingredients in Cheesemaking
Milk
Fresh, high-quality milk is the most important ingredient in cheese. The better the milk, the better the cheese — this is not a cliché but a literal truth. Cheese made from fresh raw milk from pasture-raised animals with diverse forage has dramatically more complex flavor than cheese made from pasteurized supermarket milk. If you have a homestead dairy goat or a cow share arrangement, your starting point is already superior to what most artisan cheesemakers in the country can access. If using store-bought milk, choose the freshest whole milk available and avoid ultra-pasteurized (UHT) milk — the high-heat processing denatures the whey proteins in ways that prevent proper curd formation. Look for milk labeled “pasteurized” only, not “ultra-pasteurized.”
Cultures
Starter cultures are freeze-dried or fresh preparations of specific bacteria strains that acidify milk through lactic acid production. Different cultures produce different flavor profiles. Mesophilic cultures (active at 68°F to 102°F) are used for most farmhouse cheeses, cheddars, goudas, and soft fresh cheeses. Thermophilic cultures (active at 104°F to 125°F) are used for Italian-style cheeses — mozzarella, provolone, parmesan. Cultures are available from specialty cheesemaking suppliers like New England Cheesemaking Supply (cheesemaking.com) or Cultures for Health.
Rennet
Rennet is the coagulating agent that transforms acidified milk from a liquid into a gel that can be cut into curds. Animal rennet (derived from the stomach lining of ruminants) is the traditional choice and produces the most complex flavors in aged cheeses. Vegetable rennet (derived from plants like thistle or nettles) is an alternative for vegetarian cheeses. Microbial rennet (derived from Rhizomucor miehei mold) is widely used commercially but can produce bitter flavors in long-aged cheeses. Liquid animal rennet diluted in cool unchlorinated water is the most reliable choice for homestead cheesemaking.
Salt
Salt is the final essential ingredient in virtually every cheese. It serves multiple critical functions: it draws additional whey from the curds through osmosis (helping achieve the desired moisture level); it inhibits unwanted bacterial growth on the rind and throughout the paste; it enhances and develops flavor; and in washed-rind cheeses it creates the specific conditions that encourage the development of B. linens and other rind organisms. Use non-iodized salt — iodine inhibits the starter bacteria. Kosher salt or dairy salt (a fine, pure food-grade salt) are the standard choices.
Essential Equipment for Beginning Cheesemaking
You do not need a specialized cheese cave or expensive equipment to make excellent home cheese. Here is what you actually need to start:
- A large stainless steel or enamelware pot (minimum 8-quart capacity for a 2-gallon batch)
- An accurate thermometer — a digital instant-read with accuracy to ±1°F is essential
- A long knife for cutting curds (a thin stainless bread knife works well)
- A stainless or plastic slotted spoon or ladle
- Cheesecloth (butter muslin — the fine weave, not the coarse supermarket version)
- A colander for draining
- Cheese molds (plastic cylinders with drainage holes) for pressed cheeses
- A cheese press or a DIY press with weight (for firm and hard cheeses)
- Glass jars for culturing and storage
Your First Cheese: Fresh Chèvre from Goat Milk
Fresh chèvre (French goat cheese) is the perfect beginner cheese: it requires no press, no aging, takes about 24 hours of mostly hands-off time, and produces an absolutely delicious result. It is also the most naturally obvious use for fresh homestead goat milk.
Ingredients (makes approximately 1 pound): 1 gallon fresh whole goat milk; 1/4 teaspoon mesophilic culture (or 2 tablespoons fresh cultured buttermilk); 2 drops liquid animal rennet diluted in 1/4 cup cool unchlorinated water; 1 to 1.5 teaspoons non-iodized salt.
Process: Gently heat milk to 86°F in a water bath (pot inside a larger pot of hot water) for better temperature control. Add culture and stir thoroughly for one minute. Cover and let ripen for 1 hour at 86°F. Add diluted rennet and stir with 20 gentle up-and-down strokes. Cover and let set undisturbed for 12 to 18 hours at room temperature (68°F to 72°F) until a firm curd forms with clean edges when cut. Ladle curds gently into a cheesecloth-lined colander. Tie the cloth and hang to drain for 6 to 12 hours depending on desired texture (shorter drain = creamier, longer drain = drier and more crumbly). When at desired consistency, add salt and mix thoroughly. Refrigerate and consume within 2 weeks. The whey can be fed to chickens, pigs, or used for bread-making.
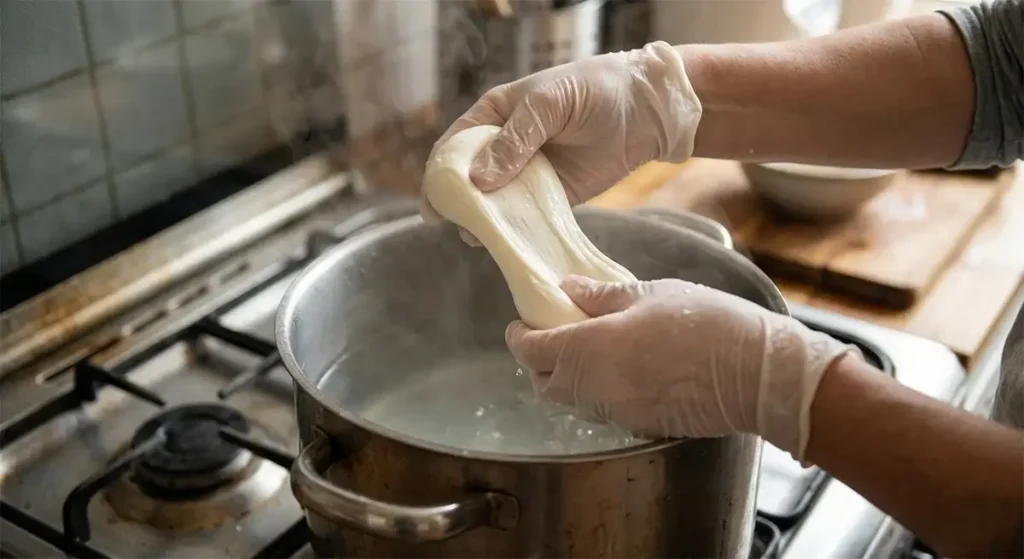
Fresh Mozzarella: The Gateway to Stretched-Curd Cheese
Fresh mozzarella is the most satisfying beginner cheese to make because the stretching step — hands in hot water, pulling and folding the curd into a smooth, elastic ball — is genuinely magical. A batch can be ready in 1 to 2 hours from start to finish.
The critical success factor is milk temperature during stretching — the curds must reach 135°F to 145°F to become elastic and stretchable. Under-heated curds tear and crumble rather than stretch smoothly. Use a thermometer and err on the side of higher temperature. One gallon of whole cow milk produces approximately 12 to 14 ounces of fresh mozzarella. Use immediately or store in lightly salted water in the refrigerator for up to 5 days.
Farmhouse Cheddar: Your First Pressed Cheese
A simple farmhouse cheddar is the entry point into pressed, aged cheeses. It requires a cheese press, a temperature-controlled aging space, and 2 to 6 months of patience, but the result is a real, complex, delicious cheddar that bears little resemblance to commercial block cheddar. Two gallons of whole cow milk produces approximately 1.5 to 2 pounds of finished farmhouse cheddar.
The key techniques unique to cheddar are cheddaring (a step where the curd is cut into slabs, stacked, and flipped repeatedly to expel whey and develop texture) and aging (a minimum of 60 days at 50°F to 55°F for a mild cheddar, 6 to 12 months for a sharp, more complex flavor). Aging temperature is critical — too warm encourages unwanted mold and off-flavors; too cold slows the enzymatic processes that develop flavor. A mini-fridge on a temperature controller set to 50°F to 55°F is the standard homestead aging cave for beginning cheesemakers.
The National Center for Home Food Preservation’s guidance on homemade cheese safety provides authoritative information on safe home cheesemaking practices, including the important distinction between fresh cheeses (which must be refrigerated and consumed quickly) and properly aged cheeses (which develop conditions inhospitable to most pathogens during the aging process).
Ricotta: Zero Waste Cheesemaking from Whey
Ricotta is one of the most practical cheeses a homesteader can make because it is produced from the whey left over from other cheesemaking — essentially converting a byproduct into a valuable product. The word ricotta means “recooked” in Italian, referring to the process of heating the whey again to precipitate the remaining whey proteins that did not coagulate during the original cheesemaking process. Heat fresh whey to 185°F to 195°F, add 1/4 cup of white vinegar or lemon juice per gallon of whey, stir gently, and let stand off heat for 10 to 15 minutes. The fine, white ricotta curds will rise to the surface and can be skimmed and drained through cheesecloth. Fresh ricotta is delicious immediately, can be salted and seasoned, and stores in the refrigerator for up to 2 weeks.
Troubleshooting Common Cheesemaking Problems
Curds will not set firmly: Usually caused by old milk with weakened protein structure, UHT milk, or insufficient rennet. Try more rennet next batch and ensure milk is not ultra-pasteurized.
Rubbery, tough curds in mozzarella: The curd was over-acidified or over-cooked. Work faster in future batches and monitor pH or timing carefully.
Bitter flavor in aged cheese: Often caused by microbial rennet in long-aged cheeses or excessive rennet use. Switch to liquid animal rennet and use the minimum effective amount.
Unwanted mold on aging cheese surface: Wipe the rind with a cloth dipped in a mild brine solution (1 tablespoon salt in 1 cup water). Some surface mold is expected and desirable in natural rind cheeses — distinguish wanted (blue-gray Penicillium) from unwanted (black or pink molds).
Final Thoughts
Cheesemaking is a skill that deepens with every batch. Your first chèvre will be good. Your tenth will be excellent. Your hundredth will be yours — a product that reflects your milk, your hands, your cave, your microclimate. Start with fresh chèvre or ricotta this week using a gallon of good whole milk. The investment in equipment is minimal, the risk of failure is low, and the reward — a bowl of fresh homemade goat cheese on your own crackers — is immediate and deeply satisfying.

Leave a Reply