
Garlic is one of the most rewarding crops a homestead gardener can grow. It requires very little space, stores beautifully for 6 to 12 months without refrigeration, commands excellent prices at farmers markets, and once you grow your own you will never want to use supermarket garlic again. The flavor difference between freshly cured homegrown garlic and the imported white bulbs sold at grocery stores is dramatic. This guide covers everything you need to plant, grow, harvest, cure, and store garlic successfully on your homestead, anywhere in the United States.
Hardneck vs. Softneck Garlic: Choosing the Right Type
Before you order seed garlic, you need to understand the fundamental division in the garlic world: hardneck versus softneck. These are not just different varieties — they are different garlic types with significantly different growing characteristics, flavors, and storage capabilities.
Hardneck Garlic
Hardneck garlic (Allium sativum var. ophioscorodon) produces a central flowering stalk called a scape that emerges in late spring. It is the choice of most serious garlic growers for flavor — hardneck varieties offer a wide range of complex, rich tastes from mild and nutty to fiery and pungent. Hardneck types divide into several subspecies groups including Rocambole, Purple Stripe, Porcelain, and Creole, each with distinct flavor profiles and climate preferences. Hardneck garlic typically produces 4 to 12 large, easy-to-peel cloves per bulb. The downside: hardneck garlic stores for only 4 to 7 months, making it ideal for personal use and local farmers market sales but not for long-term commercial storage.
Hardneck varieties are essential for gardeners in USDA Hardiness Zones 3 through 6 — the cold-winter northern regions — as they require a cold vernalization period (extended chilling) to form proper bulbs. If you are in the north and growing for flavor, grow hardneck.
Softneck Garlic
Softneck garlic (Allium sativum var. sativum) is the commercial standard — it is what fills grocery store bins and has no central stalk, which allows braiding. Softneck varieties store for 9 to 12 months under proper conditions, making them the commercial grower’s choice. Artichoke types (California Early, Inchelium Red) are the most common and productive, while Silverskin varieties are the ultimate storage garlic — some lasting over a year. Softneck garlic does not require as deep a cold period as hardneck, making it more adaptable in Zones 7 through 9 in the warm South and coastal climates.
Choosing Seed Garlic Varieties
Seed garlic refers to the garlic bulbs you purchase specifically to plant — not the grocery store garlic, which is often treated to prevent sprouting and may carry diseases. Buying quality certified seed garlic from a reputable supplier is one of the most important decisions in garlic production. Here are proven varieties by region:
Cold climates (Zones 3-5) — Hardneck choices: Music (Porcelain group — large bulbs, excellent storage for a hardneck, reliable producer); German Red (Rocambole group — exceptional rich flavor, popular at farmers markets); Chesnok Red (Purple Stripe — excellent for roasting, holds flavor when cooked); Georgian Crystal (Porcelain — huge bulbs, very cold-hardy).
Mid-Atlantic and Midwest (Zones 5-7) — Hardneck and Softneck: Inchelium Red (Artichoke softneck — excellent storage, rich flavor, consistent yields); Killarney Red (Rocambole — excellent flavor, good for Zone 6); Bogatyr (Purple Stripe — stores longer than most hardnecks, intense flavor).
Warm climates (Zones 7-9) — Softneck choices: Lorz Italian (Artichoke — large bulbs, adapted to warm winters); Silver Rose (Silverskin — exceptional long storage, mild flavor).
When to Plant Garlic
Timing is the single most important factor in garlic success. Garlic is a fall-planted crop across most of North America. The ideal planting window is 4 to 6 weeks before the ground freezes hard, giving cloves enough time to develop strong root systems before winter dormancy but not so much time that significant top growth develops before the cold sets in. This timing varies significantly by location:
- Northern states (Zones 3-5): Late September through October
- Mid-Atlantic and Midwest (Zones 5-6): Mid-October through early November
- South (Zones 7-8): November through early December
- Pacific Northwest and mild winters (Zone 8-9): October through November
In climates without a reliable cold period, garlic can be planted in late winter or early spring, but bulb size and quality is typically reduced. According to the Penn State Extension Garlic Production Guide, garlic planted in the optimal fall window consistently outperforms spring-planted garlic by 30 to 50% in bulb size and yield across all production regions.
Soil Preparation and Fertility
Garlic thrives in deep, well-drained, fertile soil with a pH between 6.0 and 7.0. It does not tolerate waterlogged conditions — sitting in wet soil after planting causes clove rot before roots can establish. If your soil is heavy clay, raise the bed height by 6 to 8 inches with added compost and coarse sand, or grow in raised beds. Garlic is a heavy nitrogen feeder that also requires adequate phosphorus for root development and sulfur for the sulfurous compounds that create its characteristic flavor.
Prepare the bed 2 to 3 weeks before planting: loosen the soil to 12 inches depth, incorporate 3 to 4 inches of finished compost, and apply a balanced organic fertilizer (blood meal, bone meal, and greensand work well as a combination) according to your soil test results. If you have not soil tested, a general application of 3 to 4 pounds of 10-10-10 fertilizer per 100 square feet is a reasonable starting point for average garden soil.
Planting Garlic Step by Step
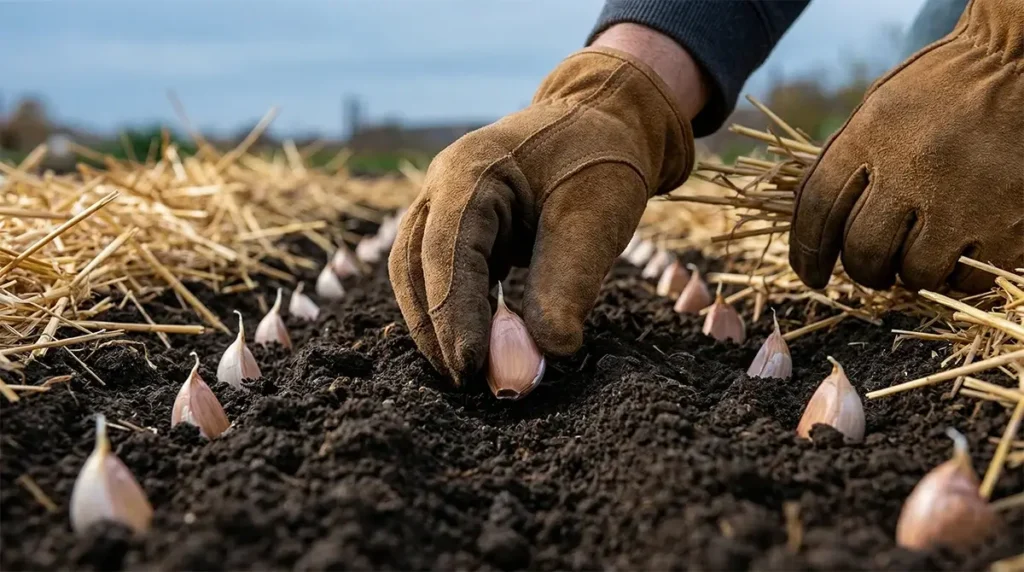
Break your seed garlic bulbs into individual cloves just before planting — not days ahead, as the exposed basal plate (the root end) begins drying out quickly. Sort cloves by size and plant the largest ones first: large cloves produce the largest bulbs. Small cloves can still be planted and will produce decent-sized bulbs if fertility is good, or they can be used in the kitchen. Plant only firm, healthy cloves — discard any that are soft, moldy, or have damaged basal plates.
Plant cloves with the pointed end up and the basal plate down, 2 to 3 inches deep measured from the top of the clove to the soil surface. Spacing depends on your target bulb size: 6 inches apart in rows spaced 12 inches apart gives good-sized bulbs with efficient land use; 8 to 9 inches apart gives larger premium bulbs at the expense of yield per square foot.
After planting, mulch immediately with 4 to 6 inches of straw, dry leaves, or wood chips. Mulch is not optional — it moderates soil temperature, suppresses winter weed germination, retains moisture, and in cold climates prevents frost-heave that can push shallow-planted cloves out of the ground over winter freeze-thaw cycles.
Spring Care: Fertilizing and Scape Removal
When garlic shoots emerge in spring (usually March to April in most regions), resume care with two applications of nitrogen fertilizer: one in early spring when shoots are 4 to 6 inches tall, and one in mid-spring about a month later. These nitrogen applications drive the rapid leaf growth that determines final bulb size — each leaf produced corresponds to a wrapper layer on the finished bulb. Stop all nitrogen applications by the time you see the lower leaves beginning to yellow, which signals the plant is redirecting energy from leaf growth to bulb development.
Hardneck garlic sends up a curling flower stalk called a scape in late spring, usually in June in most northern climates. Remove scapes when they complete one full curl — snap or cut them off at the base where they emerge from the top leaves. Removing the scape redirects the plant’s energy from seed production back to bulb development, increasing final bulb size by 20 to 30%. Scapes are delicious — use them like mild garlic in stir-fries, pesto, and egg dishes.
Knowing When to Harvest
Harvest timing is the skill that separates experienced garlic growers from beginners. The key indicator is the number of green leaves remaining. Each green leaf corresponds to a wrapper layer on the bulb — when you dig, you want enough wrappers remaining to protect the bulb in storage (at least 4 to 5), but not so many that the bulb has not yet reached full size. The standard recommendation is to harvest when half the leaves are green and half are brown and dried. In most northern climates, this falls in late June through July for fall-planted garlic.
Do not wait until all leaves are brown — by then the outer wrappers have already begun to deteriorate and the bulb segments may have separated, drastically reducing storage life. Harvest on a dry day. Loosen the soil with a digging fork inserted 6 inches from the plant (inserting directly beside the bulb risks piercing it), then lift the bulb gently by the stem. Lay harvested bulbs on the soil surface or in a shaded, ventilated area for 15 to 20 minutes to dry slightly before handling.
Curing Garlic for Long-Term Storage
Freshly dug garlic is not ready to eat or store — it must be cured for 3 to 6 weeks to develop its full flavor, dry the outer wrappers, and seal the neck to prevent rot and moisture intrusion. Cure garlic in a dry, shaded location with good air circulation and temperatures between 75°F and 90°F. A covered porch, barn loft, or shade structure with wire mesh shelving works well. Do not cure in direct sun — UV exposure damages the outer wrappers and reduces storage life.
Hang bundles of 10 to 15 bulbs by their dried stems or lay single layers on wire mesh racks. Leave all wrappers and stems intact during curing — do not clean or trim until curing is complete. Curing is complete when the stem above the bulb is completely dry and the outer wrappers are papery and crackling. Then trim stems to 1 inch and roots flush, brush off loose soil, and store in a cool (55 to 65°F), dry, well-ventilated location. Properly cured hardneck garlic stores 4 to 7 months; softneck stores 9 to 12 months.
Saving Your Own Seed Garlic
One of the great long-term advantages of growing garlic is the ability to save your own seed stock year after year. After each harvest, set aside your 10 to 20% largest, most perfect bulbs from each variety as seed garlic for the following fall. Over several years of selecting the largest and healthiest bulbs for replanting, your seed stock adapts to your specific soil and microclimate — a process of local adaptation that can meaningfully improve yields and plant vigor. Label each variety carefully during harvest and curing to avoid mixing your seed stock.
The SARE (Sustainable Agriculture Research and Education) Garlic Production Guide is an outstanding free resource covering variety selection, soil management, production economics, and marketing strategies for small-scale garlic growers considering both personal use and farmers market sales.
Garlic as a Market Crop
Quality garlic sells at farmers markets for $1.50 to $3.00 per head for standard varieties and $4.00 to $8.00 per head for premium hardneck types like German Red or Chesnok Red. A well-managed 500 square foot bed can yield 300 to 500 bulbs — enough to generate $450 to $1,500 in gross farmers market revenue. This makes garlic one of the highest-return-per-square-foot crops available to small homestead market gardeners.
Final Thoughts
Garlic is one of those crops where the commitment is low, the investment is modest, and the reward is completely disproportionate to the effort. Plant in fall, mulch well, fertilize in spring, remove scapes, harvest when half the leaves are brown, cure for a month. That is the entire process. Master it once and you will have homegrown garlic on your table for 10 months out of every year, with enough seed saved to never pay for garlic again.

Leave a Reply